Citrix XenServer und local ISO Repository

Man kann zwar über das „klickbunit“ Interface XenCenter für seinen einzelnen XenServer neue ISO libarays anlegen, diese können dann leider nur auf einem Windows File Shareing (CIFDS) oder NFS ISO Share liegen. Klar, man könnte nun eine VM auf dem XenServer installieren und dort einen solchen Share anlegen O_o oder eine Kiste neben den Server stellen, welcher die ISOs vorhält. In größeren Umgebungen kein Problem… Im „Kleinen“ schon mal nervig.

Ich habe für mich eine einfache Lösung gefunden. Ich schraube einfach eine weitere kleine Platte in den Server, lege dort die für mich wichtigen ISOs ab und baue mir eine lokale ISO library. So habe ich die nötigen ISOs immer auf der Kiste, selbst wenn alles andere aus sein sollte.

Also lokalen Speicherplatz für die ISOs habe ich an eine 160GB SATA Platte von WD gedacht. Diese wird nicht gespiegelt oder ähnliches, da die ISO Files für mich erstmal keinen Wert haben. Brennt die Platte wirklich ab, kopiere ich die ISO Files halt auf eine neue.

Nach dem Einbau ist die WD Platte in meinem System als /dev/sde zu finden. Als erstes werde ich nun auf ihr eine primäre Patrion vom Type 83 (Linux) anlegen:

Plain text
Copy to clipboard
Open code in new window
EnlighterJS 3 Syntax Highlighter
$ fdisk /dev/sde
The number of cylinders for this disk is set to 19457.
There is nothing wrong with that, but this is larger than 1024,
and could in certain setups cause problems with:
1) software that runs at boot time (e.g., old versions of LILO)
2) booting and partitioning software from other OSs
(e.g., DOS FDISK, OS/2 FDISK)
Command (m for help):
$ fdisk /dev/sde The number of cylinders for this disk is set to 19457. There is nothing wrong with that, but this is larger than 1024, and could in certain setups cause problems with: 1) software that runs at boot time (e.g., old versions of LILO) 2) booting and partitioning software from other OSs (e.g., DOS FDISK, OS/2 FDISK) Command (m for help):
$ fdisk /dev/sde

The number of cylinders for this disk is set to 19457.
There is nothing wrong with that, but this is larger than 1024,
and could in certain setups cause problems with:
1) software that runs at boot time (e.g., old versions of LILO)
2) booting and partitioning software from other OSs
   (e.g., DOS FDISK, OS/2 FDISK)

Command (m for help):

Die Hilfe zu fdisk kann sicher jeder selbst lesen… Ich schaue als erstes über p nach ob ich wirklich auf der richtigen Platte bin, denn p listet mir die Partitionen auf der Platte auf. Dann erstell ich mit n ==> p ==> 1 eine neue primäre Partition und schreibe am Ende alles mit w auf die Platte. q beendet als letztes fdisk.

Nun muss ich die neue Partition noch formatieren. Als Dateisystem finde ich ext3 ganz passend:

Plain text
Copy to clipboard
Open code in new window
EnlighterJS 3 Syntax Highlighter
$ mkfs.ext3 -L ISO-Store /dev/sde1
mke2fs 1.39 (29-May-2006)
Filesystem label=ISO-Store
OS type: Linux
Block size=4096 (log=2)
Fragment size=4096 (log=2)
19546112 inodes, 39072080 blocks
1953604 blocks (5.00%) reserved for the super user
First data block=0
Maximum filesystem blocks=0
1193 block groups
32768 blocks per group, 32768 fragments per group
16384 inodes per group
Superblock backups stored on blocks:
32768, 98304, 163840, 229376, 294912, 819200, 884736, 1605632, 2654208,
4096000, 7962624, 11239424, 20480000, 23887872
Writing inode tables: done
Creating journal (32768 blocks): done
Writing superblocks and filesystem accounting information: done
This filesystem will be automatically checked every 26 mounts or
180 days, whichever comes first. Use tune2fs -c or -i to override.
$ mkfs.ext3 -L ISO-Store /dev/sde1 mke2fs 1.39 (29-May-2006) Filesystem label=ISO-Store OS type: Linux Block size=4096 (log=2) Fragment size=4096 (log=2) 19546112 inodes, 39072080 blocks 1953604 blocks (5.00%) reserved for the super user First data block=0 Maximum filesystem blocks=0 1193 block groups 32768 blocks per group, 32768 fragments per group 16384 inodes per group Superblock backups stored on blocks: 32768, 98304, 163840, 229376, 294912, 819200, 884736, 1605632, 2654208, 4096000, 7962624, 11239424, 20480000, 23887872 Writing inode tables: done Creating journal (32768 blocks): done Writing superblocks and filesystem accounting information: done This filesystem will be automatically checked every 26 mounts or 180 days, whichever comes first. Use tune2fs -c or -i to override.
$ mkfs.ext3 -L ISO-Store /dev/sde1
mke2fs 1.39 (29-May-2006)
Filesystem label=ISO-Store
OS type: Linux
Block size=4096 (log=2)
Fragment size=4096 (log=2)
19546112 inodes, 39072080 blocks
1953604 blocks (5.00%) reserved for the super user
First data block=0
Maximum filesystem blocks=0
1193 block groups
32768 blocks per group, 32768 fragments per group
16384 inodes per group
Superblock backups stored on blocks:
    32768, 98304, 163840, 229376, 294912, 819200, 884736, 1605632, 2654208,
    4096000, 7962624, 11239424, 20480000, 23887872

Writing inode tables: done                            
Creating journal (32768 blocks): done
Writing superblocks and filesystem accounting information: done

This filesystem will be automatically checked every 26 mounts or
180 days, whichever comes first.  Use tune2fs -c or -i to override.

Nun erstelle ich einen Mountpoint unter welchem ich die Platte einbinden möchte:

Plain text
Copy to clipboard
Open code in new window
EnlighterJS 3 Syntax Highlighter
$ mkdir /ISOs
$ mkdir /ISOs
$ mkdir /ISOs

Schon kann ich die Platte mounten:

Plain text
Copy to clipboard
Open code in new window
EnlighterJS 3 Syntax Highlighter
$ mount /dev/sde1 /ISOs

Noch schnell eine kontrolle ob alles dort ist wo es hin soll:

Plain text
Copy to clipboard
Open code in new window
EnlighterJS 3 Syntax Highlighter
$ mount|grep ISO
/dev/sde1 on /ISOs type ext3 (rw)
$ mount|grep ISO /dev/sde1 on /ISOs type ext3 (rw)
$ mount|grep ISO
/dev/sde1 on /ISOs type ext3 (rw)

Mit einem Eintrag in die fstab (ich muss immer aufpassen nicht vfstab zu schreiben) sorge ich nun dafür dass die neue Platte bei jedem Start des Servers wieder eingebunden wird.

Plain text
Copy to clipboard
Open code in new window
EnlighterJS 3 Syntax Highlighter
$ vi /etc/fstab
$ vi /etc/fstab
$ vi /etc/fstab

und dann folgende Zeile einfügen:

Plain text
Copy to clipboard
Open code in new window
EnlighterJS 3 Syntax Highlighter
/dev/sde1 /ISOs ext3 defaults 0 0
/dev/sde1    /ISOs    ext3    defaults    0 0

Jetzt kommt das wirklich spannende. XEN die neue Platte als localen ISO Speicher schmackhaft zu machen:

Plain text
Copy to clipboard
Open code in new window
EnlighterJS 3 Syntax Highlighter
$ xe sr-create name-label=ISOs type=iso device-config:legacy_mode=true device-config:location=/ISOs content-type=iso
00da02b3-8b46-bade-6d00-e109e262ede9
$ xe sr-create name-label=ISOs type=iso device-config:legacy_mode=true device-config:location=/ISOs content-type=iso 00da02b3-8b46-bade-6d00-e109e262ede9
$ xe sr-create name-label=ISOs type=iso device-config:legacy_mode=true device-config:location=/ISOs content-type=iso
00da02b3-8b46-bade-6d00-e109e262ede9

Schaut doch schon gut aus, oder? Dann lassen wir uns mal die neue ISO library anzeigen:

Plain text
Copy to clipboard
Open code in new window
EnlighterJS 3 Syntax Highlighter
$ xe sr-list uuid=00da02b3-8b46-bade-6d00-e109e262ede9
uuid ( RO) : 00da02b3-8b46-bade-6d00-e109e262ede9
name-label ( RW): ISOs
name-description ( RW):
host ( RO): xenserver01-kernel-error.local
type ( RO): iso
content-type ( RO): iso
$ xe sr-list uuid=00da02b3-8b46-bade-6d00-e109e262ede9 uuid ( RO) : 00da02b3-8b46-bade-6d00-e109e262ede9 name-label ( RW): ISOs name-description ( RW): host ( RO): xenserver01-kernel-error.local type ( RO): iso content-type ( RO): iso
$ xe sr-list uuid=00da02b3-8b46-bade-6d00-e109e262ede9
uuid ( RO)                : 00da02b3-8b46-bade-6d00-e109e262ede9
          name-label ( RW): ISOs
    name-description ( RW):
                host ( RO): xenserver01-kernel-error.local
                type ( RO): iso
        content-type ( RO): iso

Warum auch immer, wird die Platte bei mir an diesem Punkt immer ausgehangen. Ich könnte es jetzt einfach wieder mounten und nutzen, würde denn noch vorschlagen hier den Server selbst einmal zu rebooten. So kann man gleich sehen ob die Platte wieder richtig eingebunden wird. Nach dem Reboot schaue ich also nach ob die Platte wieder richtig eingehangen wurde:

Plain text
Copy to clipboard
Open code in new window
EnlighterJS 3 Syntax Highlighter
$ mount|grep ISO/dev/sde1 on /ISOs type ext3 (rw)

Jetzt kopiere ich das nötige ISO auf die Platte:

Plain text
Copy to clipboard
Open code in new window
EnlighterJS 3 Syntax Highlighter
scp WindowsSvrStd2008R2.iso root@10.44.2.88:/ISOs
WindowsSvrStd2008R2. 100% |******************************************************************************************************************************************************************************************| 3052 MB 01:28
scp WindowsSvrStd2008R2.iso root@10.44.2.88:/ISOs WindowsSvrStd2008R2. 100% |******************************************************************************************************************************************************************************************| 3052 MB 01:28
scp WindowsSvrStd2008R2.iso root@10.44.2.88:/ISOs
WindowsSvrStd2008R2. 100% |******************************************************************************************************************************************************************************************|  3052 MB    01:28

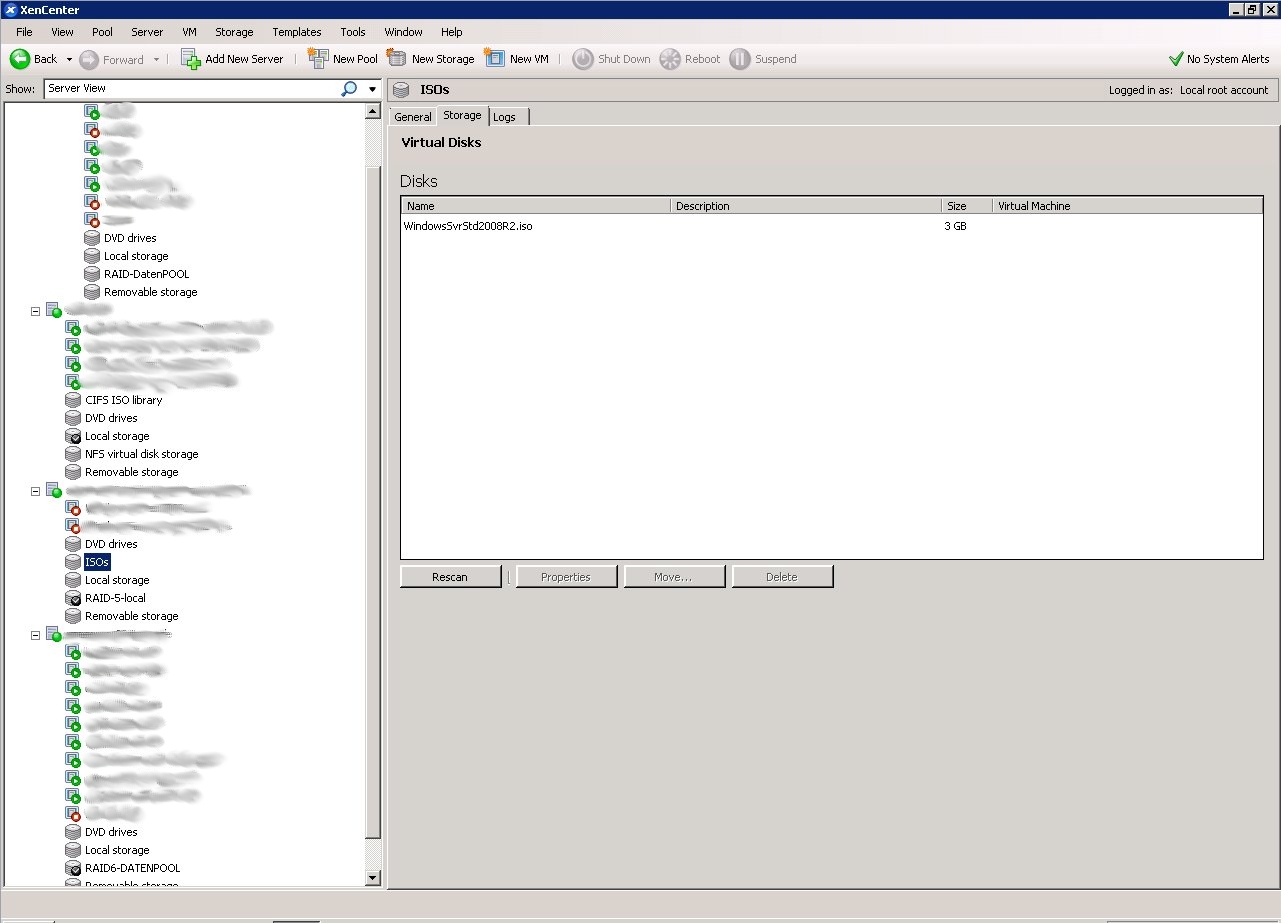
Im XenCenter sollte man nun schon das neue SR mit dem Namen „ISOs“ sehen. Klicke man nun am Reiter Storage auf Rescan wird das hochgeladene ISO gefunden und kann verwendet werden. Ich muss nun also nur noch alle meine ISOs dort hochschieben und fertig ist!
Citrix XenCenter SR local ISO library